Search This Blog

Wednesday, 23 April 2014

Adobe LiveCycle Designer Tip #4 - Setting Breakpoints

Debugging a Designer form can be frustrating for people used to other environments.  With a Designer form you often have to add console.println(...) calls to your code so you can work out what is going on.  However, you can do most of the things you expect with a debugger, but there are a few tricks.

First you can only debug JavaScript, there is no support for debugging FormCalc scripts.  Second, you can only set breakpoints in event handlers, you can step into a script object but you can't set a breakpoint in one and the JavaScript debugger will not show you the code being debugged.  It will at least show you which line number you are on and the JavaScript debugger console will allow you to display the values of form object properties and variables.

To set a breakpoint you must open the form in Acrobat, the Preview PDF within Designer does not seem to support all the debugging functionality available.  The simplest way to do this is to perform a Preview PDF, Designer will generate a temporary file in your temp directory with a random name.  So in Adobe Acrobat you can go File ... Open ... then type "%temp%" (without the quotes) in the File name field click the open button and find the most recent PDF file with a randomly generated name something like "_165o26cev28fbb2ut.pdf".

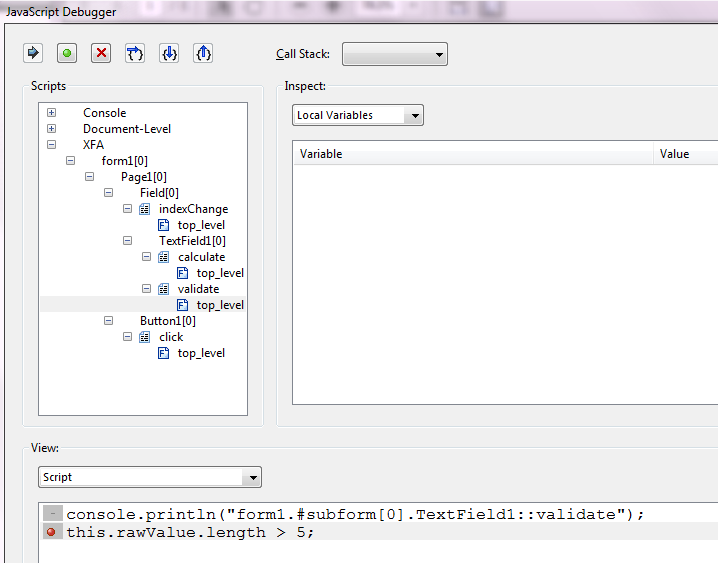
Once open in Acrobat the JavaScript debugger will now display the Hierarchy of the form, you will be able the expand the XFA node and navigate to a piece of event code and set a breakpoint, like this one on line 2 of the validate event of TextField1, just click where the red dot is.


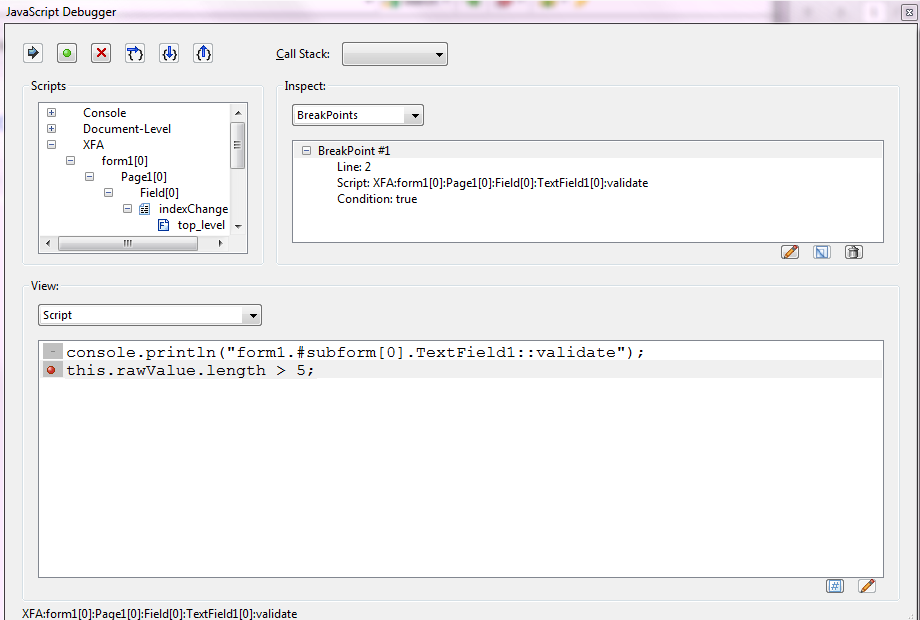
To see all the breakpoints you have set select BreakPoints in the Inspect: drop down (which will have defaulted to Local Variables), this will display all the current breakpoints, in this case we only have one so it looks like;


If you want to make the breakpoint conditional, select the breakpoint and click the edit button;


This will bring up a "change the breakpoint condition to:" dialog, like;


The default condition is true (so always breaks) but you can enter any JavaScript expression that resolves to true or false.  So in this example we could type this.rawValue.length == 3 and the breakpoint will only be hit when we validate the field and it has a three character long value.

You can also list all the breakpoints using the JavaScript console.  In the View drop down select console and type the following (to execute select the snippet and use the Ctrl-Enter on the numeric keypad);

for ( var i = 0; i < dbg.bps.length; i++ )
{
    console.println(dbg.bps[i].toSource());
}

This will display something like;

({fileName:"XFA:form1[0]:Page1[0]:Field[0]:TextField1[0]:validate", lineNum:2, condition:"this.rawValue.length == 3"})

Then you can use the following to clear the breakpoint

dbg.cb({fileName:"XFA:form1[0]:Page1[0]:Field[0]:TextField1[0]:validate", lineNum:2})

And to set the breakpoint again you can use;

dbg.sb({fileName:"XFA:form1[0]:Page1[0]:Field[0]:TextField1[0]:validate", lineNum:2, condition:"this.rawValue.length == 3"})

The dbg object also has methods for step into, step over, step out, etc but it is generally easier to use the toolbar of the JavaScript Debugger.

Watches

In the Inspect drop down there is also a Watches option this will allow you to enter any form object property or variable and watch the value change as you step thought your code.


Saturday, 12 April 2014

Programmatically updating Rich Text (or xHTML)

In a previous sample I gave an example of updating the rich text of a draw object using E4X.  In this sample I want to show an alternative using the Span objects from the Adobe Reader API. 

The Span object does not cater for all the attributes of rich text that are supported in an XFA form but sometimes can be easier than using E4X.

So an example, the rich text "Please click the red button" is generated by the xHTML;

<body xmlns="http://www.w3.org/1999/xhtml" xmlns:xfa="http://www.xfa.org/schema/xfa-data/1.0/">
    <p style="letter-spacing:0in">
        Please click the<span style="color:#ff0000">red</span>button
    </p>
</body>

As an array of Spans objects this is represented as

({text:"Please click the "})
({text:"red", textColor:["RGB", 1, 0, 0]})
({text:" button"})


Then the code to change all the red text to green would be;

var spans = util.xmlToSpans(Text1.value.exData["##xHTML"].saveXML());
for (var i = 0; i < spans.length; i++)
{

    if (spans[i].textColor && color.equal(spans[i].textColor, color.red))
    {

        spans[i].textColor = color.green;
        spans[i].text = "green";
    }
}

var xHTML = util.spansToXML(spans);
Text1.value.exData.loadXML(xHTML, falsetrue);

The color object used in this code is also from the Adobe Reader API, it defines some common colors  (that is black, white, dkGray, gray, ltGray, red, green, blue, cyan, magenta and yellow).  As well as the color.equal() method it also has a color.convert() method so to change all the colors to a gray scale we could;

var spans = util.xmlToSpans(Text1.value.exData["##xHTML"].saveXML());
for (var i = 0; i < spans.length; i++)
{

    if (spans[i].textColor)
    {
        spans[i].textColor = color.convert(spans[i].textColor, "G");
    }

}
var xHTML = util.spansToXML(spans);
Text1.value.exData.loadXML(xHTML, falsetrue);

If anyone still needs to have a color form for the screen and a black and white version for printing and uses rich text then this code could go in the prePrint event and then in the postPrint event you could revert to the original formatting with;

Text1.nodes.remove(Text1.value);
Removing the changes made in the Form DOM resets the properties to their initial values as defined in the Template DOM.

To build a rich text value from scratch we could;

var spans = [];

spans.push({text:"Hello "});

spans.push({text:NameField.rawValue, fontWeight:700, fontStyle:"italic"});
spans.push({text:", I hope you like this sample"});

var xHTML = util.spansToXML(spans);

Text1.value.exData.loadXML(xHTML, false, true);

If you need to change a plain-text Text field into a rich-text one then you can use the following code;

if (Text1.value.oneOfChild.className === "text")
{
    Text1.value.nodes.remove(Text1.value.text);
    var exDataNode = xfa.form.createNode("exData");
    Text1.value.nodes.append(exDataNode);
}

The sample SpanDemos.pdf includes a couple of other simple examples, as well as a more complicated example that will take the body element of the rich text then format and colorize it.  This sample also shows a workaround for the lack of support for the xfa-spacerun:yes style attribute in the Span objects.


background-color style attribute

This attribute is not mentioned in the XFA spec and there is no support for it with the Designer UI but Reader will render the background color, you just need to enter it in the XML Source view.  The trick with using background-color is that all elements following the one the style is applied to will inherit the color.  In an HTML page only the descendent elements would inherit the color.  This just means you need a second background-color style attribute to reset the color.  Designer doesn't play well with this attribute as every time you edit the text using the Design view you will have to add the second background-color style attribute back.

The color can be specified in hexadecimal or decimal;

background-color:#C4C4C4     or     background-color:rgb(196,196,196)

You can see an example of the background-color style attribute in this sample. 

I haven't gone though all the style attributes to see which ones are supported, but I did try adding a border and that didn't work for me.

Thursday, 27 March 2014

Using the util.print methods

Generally we can you display patterns to for formatting but there are times when we have to format values in code, and there are three handy methods in the Adobe Reader API;

util.printd() for dates
util.printf() for numbers
util.printx() for text

Here are some samples of using these methods;

Code Output Description
var v = util.printx(">?<*","ADOBE")
console.println(v)
Adobe This changes the first character (represented by the ?) to uppercase (represented by the >) and all trailing characters (represented by the *) to lowercase (represented by the <)
var v = util.printx("9999999999","My phone number is (02) 1111 2222")
console.println(v)
0211112222 Copies the first 10 digits, skipping any others characters
var v = util.printd("mmmm",new Date())console.println(v)

March Prints the current month in full.
var v = util.printd("dddd",new Date())console.println(v) Thursday Prints the current day of the week in full
var v = util.printd("date.short(){}",new Date(),true);
console.println(v)
27/03/14 Prints the date in the same format as the "datetime.short{}" display pattern.  The actual output will vary depending on the current locale.
var v = util.printd("date(fr){MMMM}",new Date(),true)console.println(v) mars Prints the current month in French
var v = util.printf("%,105d", 2)console.println(v) 00002 Prints the number 2 in a width of 5 characters with "0" characters padding


Friday, 28 February 2014

Updated: Drop-Down List Control with auto-complete (Searchable Drop-Down List)

I have made some changes to my "Drop-Down List Control with auto-complete" sample. 

To start I would like to explain the title of this sample, as it is really a textbox pretending to be the UI portion of the drop down list and a textbox pretending to be the list portion of drop down list.  I am not sure what I would have called the sample but "Drop-Down List Control with auto-complete" and "Searchable Drop-Down List" came from the title of the first two forum posts I tried to answer with this sample.  It seems we can't update the entries in a drop down list when the list is open, which is why I have tried to mimic the behaviour with these two controls.

The changes I have made are;
  • Display the list when the user enters the field, so the user knows this field is special
  • Show some "ghost text", giving instructions to the user
  • Sort the values in the list
  • Allow for strict scoping
  • Allow for keyboard users, previous the sample only worked with the mouse.

To use this in your own form

  • Copy the subform DropDownList to you own form
  • If you don't want the option to match first characters/match any characters the delete the RadioButtonList under the DropDownList subform.  You may need to update the code in the initialise event of DropDownList subform to set the default option, currently it defaults to match first characters.
  • Change the null display pattern in the Search textbox, to suit the items you are search over.  This is how the "ghost text" is implemented and currently says "'Search by country name".
  • Update the code in the change event of the Search textbox, this is where the matching is performed against the list of countries.  The format of the countries XML list is;
    • <Country>
            <Region>Oceania</Region>
            <Code>36</Code>
            <Name>Australia</Name>
        </Country>
    • So the binding expression for match first characters is;
      '$record.Country.[Lower(Left(Name,' + (xfa.event.newText.length) + ')) == "' + xfa.event.newText.toLowerCase() + '"]'
    • This matches the left characters of the Name element against the characters entered in the Search textbox, xfa.event.newText.  A case insensitive match is made by calling toLowerCase() on the xfa.event.newText and calling the FormCalc function Lower on the Name element.  I find the using FormCalc in binding expressions to be about four times faster.

The sample

For a PDF version of the sample with the countries data already imported download CountriesV2.pdf.  For the XDP template download CountriesV2.xdp and the preview data Countries.xml.

Sunday, 9 February 2014

Listing all fields in a form - The macro

Radzmar has written a macro that makes Listing all fields in a form method I described in a previous blog a lot easier.

The macro contains the XSLT so you no longer need to copy it around and the macro also resolves the namespace so the XSLT will work for all Adobe Reader target versions.

Run the macro and you will be prompted to save the XML file that can be opened into Microsoft Excel as an XML table, without having to make temporary changes to your XDP file.

Download the macro in XFAObjectList.zip which contains the JavaScript of the macro and the macro.xml file Designer uses to create the Tools ... Macros menu items.

Saturday, 1 February 2014

Adding values in a form to an email

Consider we have some text like "Please contact us or visit our website for more information" in our form.  So if our user clicks on "contact us" we open an email client and if they click on "website" we open the web page in the browser.

Before Designer ES2 we would have done this with two buttons with no background or border and using positioned layout carefully placed them in the correct spot.  The "contact us" button would have called the app.mailMsg and the "website" button would have called app.launchURL.

Since Designer ES2 we can add these as hyperlinks directly into a text control.  This means the links are correctly announced when using the accessibility screen readers,  but it also makes it harder to include values from the form in the email.  We might want to send the email to different recipients, use different subject lines or generate different body text depending on other values selected in the form.

If you look at the XML Source for the text control you will see a rich text value that looks something like;

<body xmlns="http://www.w3.org/1999/xhtml" xmlns:xfa="http://www.xfa.org/schema/xfa-data/1.0/">
  <p style="text-decoration:none;letter-spacing:0in">
   Please
   <a href="
mailto:sample@example.com">contact us</a>
   or visit our
   <a href="
http://adobelivecycledesignercookbookbybr001.blogspot.com.au/">website</a>
   for more information
  </p>
</body>


The full syntax for the mailto link is

mailto:emailaddress?cc=emailaddress?bcc=emailaddress?subjext=text?body=text

Even though the Designer interface only supports the to email address and the subject header, the cc, bcc and body still work. We just need some code to update the mailto link.

To do this I am using E4X.

To start load the rich text value into an E4X XML object,  to do this we must first remove the XML declaration.  Note that the class name of the rich text value is "#html" and to refer to an element we need to prefix it with a "#" character, which is why we see the rather strange looking double "##".

var body = new XML(Text1.value.exData["##xHTML"].saveXML().replace(/^<\?xml\s+version\s*=\s*(["'])[^\1]+\1[^?]*\?>\n*/, "")); 

Declare the namespace and set the white space handling to be the same as Adobe Designer.

var xhtml = new Namespace("
http://www.w3.org/1999/xhtml");
XML.ignoreWhitespace = false;
XML.prettyPrinting = false;


Loop though all the anchor tags

for each (var anchorTag in body..xhtml::a)
{


  Look for the "mailto:" tag

 if (
anchorTag.@href.toString().indexOf("mailto:") === 0)
 {


   Generate the new "mailto" tag based on fields within the form

  attributes = [];
  
anchorTag.@href = "mailto:" + ToAddress.rawValue;
  if (!CCAddress.isNull)
  {
   attributes.push("cc="+CCAddress.rawValue);
  }
  if (!BCCAddress.isNull)
  {
   attributes.push("bcc="+BCCAddress.rawValue);
  }
  if (!Subject.isNull)
  {
   attributes.push("subject="+encodeURI(Subject.rawValue));
  }
  if (!Body.isNull)
  {
   attributes.push("body="+encodeURI(Body.rawValue));
  }
  if (attributes.length > 0)
  {
   
anchorTag.@href += "?" + attributes.join("&");
  }
  anchorTag.setChildren(anchorTag.toString());
 }
}


Load the new value back into the text control.

Text1.value.exData.loadXML(body.toXMLString(), /* Ignore root node */ false, /* Overwrite content */ true);


If you wanted to send an email to a list of addresses just separate them with a comma.

Enabling / Disabling a hyperlink

We can use a very similar approach to enable and disable a hyperlink.

To disable, we would do;

anchorTag.@style = "color:#969696";
delete anchorTag.@href;


To enable, we would do;

delete anchorTag.@style;
anchorTag.@href = "http://adobelivecycledesignercookbookbybr001.blogspot.com.au/";


To see this in action download this sample, EmailHyperlink.pdf.

Friday, 24 January 2014

Listing all fields in a form

Because the XDP file that defines a Designer form is just a XML file we can run an XSLT over it.

In this case we will produce a list of all the field objects that we can view in Microsoft Excel,  so we will also use Excel to run the XSLT.

First download the XSLT file, XSPFieldList.xslt , and place it in the same directory as the XDP file of your form.

Edit your form XDP file using Notepad or similar and add the following line after the XML declaration;

<?xml-stylesheet type="text/xsl" href="XDPFieldList.xslt"?>

So it should look something like;


There is a line in the XSPFieldList.xslt that looks like;

xmlns:xfa="http://www.xfa.org/schema/xfa-template/2.8/"

This might need to change to match the namespace in your XDP file (see the last line in the screen shot above)  depending on which version of Reader your form is targeting. The namespace ending in  xfa-template/2.8 means my form is targeting Reader 9.0 and above. For Reader 9.1 and above it would be xfa-template/3.0.

Now in Microsoft Excel open the XDP file (Excel doesn't know about XDP files so your will have to select "All Files (*.*)" in the Open dialog).  The first thing Excel will do is popup an Import XML... dialog;


This means it has found our xml-stylesheet line and wants to confirm we want to run the XSLT, so select "Open the file with the following stylesheet applied (select one):"

You will then get a "different format" message, which is fair enough as the XSLT will have changed the format so select Yes;


Then you get an Open XML dialog, which defaults to "As an XML table" which is what we want to do, so select OK.


The final dialog is the no schema message.  We haven't provided a schema so Excel will create one for us.  This dialog you can turn off.


The final result will look something like;


There is a lot you can add to the XSLT so think of this as a starting point, and remember to remove the xml-stylesheet line from the XDP as Designer will think the form is created in a new version and not allow you to do much except look at the XML Source.

Response Files

This approach can also be helpful in working with a response file from the collection of returned forms.  If you export the responses as XML then they can be processed by an XSLT and loaded into Excel in the same way.

If your XSLT produces an HTML document containing a HTML table then Excel will still load it into a spreadsheet, but you now can specify business names for the columns not just the field names from the form, so you can now have spaces in the column names. 

The XSLT will also allow you to do some decoding, such as turning 1 and 0 into 'Yes' and 'No' or whatever formatting you want.

UPDATE

Radzmar has written a macro to make the first couple of steps easier, so you no longer need to make a temporary change to your XDP file and the macro works out the correct namespace.   More details in a later blog Listing all fields in a form - The macro.