Search This Blog

Friday, 11 July 2014

Yet another way of looping though a list of form nodes

SpiderMonkey JavaScript 1.7 (the JavaScript engine used in Firefox and Adobe Reader) introduced an Iterator extension.  This is not available in other browsers but we don't need to worry about that.  With a custom Iterator we can loop though form nodes using for ... in statement;


for (var field in XFAUtil.NodeIterator(NumericField))
{
    console.println(field.somExpression + " has a value of " + field.rawValue);
}

An iterator is used by assigning a generator function to the __iterator__ method, so the NodeIterator object used above looks like;

function NodeIterator(node)
{
    var nodeList = node.parent.resolveNodes(node.name + "[*]");
    var limit = nodeList.length;
    var current = 0;
    return {
        __iterator__ : function ()
        {
            return {
                next : function ()
                {
                    if (current >= limit) throw StopIteration;
                    return nodeList.item(current++);
                }
            }
        }
    }
}

The problem with this is the StopIteration exception gets thrown when we get to the end of the list. This probably won't be a problem for the end user but is a pain for the developers who will typically have the "When exception thrown" option set to break.

We can hide this by adding a forEach method similar to the one available for an array.  For example to sum the values of an array we can do;

var total = 0;
[1,2,3,4].forEach(function(v) { total += v; });
console.println(total); // prints 10 

Similarly we can now sum up all the values of all the numeric fields called NumericField using;

var total = 0;
XFAUtil.NodeIterator(NumericField).forEach(function(v) { total += v.rawValue; });
total;


Or process all the fields of the same type using the NodeClassIterator

var total = 0;
XFAUtil.NodeClassIterator(CheckBox1).forEach(function(v) { if (v.rawValue === 1) total++; });
MessageText.presence = (total >= 2) ? "hidden" : "visible"

It may still be better to use the good old for loop, the main advantage of using this technic is it hide some of the XFA stuff.  But maybe if you have some rule regarding all rows with a a quantity value greater than 100 then it would be good to put this logic in the one place.

Here's a sample form using the approach, CustomIterator.pdf.

Thursday, 3 July 2014

Adobe LiveCycle Designer Tip #5 - Palette Control

Designer has 16 different palettes, a design surface and a script editor window.  In an ideal world we would have two screens so we can spread them all out.

For those of us with only one screen moving from palette to palette can be a pain.  If you have them docked at the sides then you'll need to click the 'thumb' controls to expand, which I find a bit of a small target to click on.


What I find easier is to have the palettes in one palette window.  I have the Hierarchy, Data View, Style Catalog, Info, Font, Paragraph, Drawing Aids, Style Catalog on the left and Object, Layout, Border, Accessibility, Object Library, Fragment Library on the right.

To drag a palette onto another palette window drag the palette tab (not the palette title bar) on top of the target palette.


You can then end up with a layout looking like;


Which gives me a bigger target to click on.

Tuesday, 24 June 2014

Season Planner (or Year Planner) PDF Template

This is a sample PDF form that generates a calendar with each month on a separater row and with all the weekends lined up in the same columns.

You can select a paper size, language, a start and end date and the colors and patterns for the borders, weekends, unused cells.  Once the calendar has been generated you can then enter the details of the events in the calendar.  Use ctrl-e to bring up the format text toolbar, you can also use ctrl-click to bring up a menu of color and fill pattern options.

The final PDF can then end up with something that looks like this;


On the screen, at normal magnification, the borders may appear to be overwritten but on paper the come out fine.

If you have stumbled across this page looking for something to generate a calendar then you can down load the SeasonCalendar.pdf, fill in the fields and away you go.   If you are using Adobe Reader you may get a message saying "Cannot save file information", in which case you can try printing to a file or if all you are after is a paper copy then the standard printing options will still work.

This blog is about working with PDF Forms (or Adobe XML Forms ... XFA), so only continue reading if you want some ideas about writing your own forms.

Tool Tips

The tool tips in this form are generated by positioning a subform next to the relevant field instead of using the built in tooltips.  This allows for rich text to be used and a more attractive looking tooltip.  The fields can still be in a flowed container as long as the parent container is positioned and the tooltip subforms are in the same positioned container.

This sample uses two subforms, one with a arrow pointing up to be positioned under a field and one with an arrow point left to be positioned to the right of a field.

Each field defines it's tooltip text in the initialise event;

var helpText = <body xmlns="http://www.w3.org/1999/xhtml" xmlns:xfa="http://www.xfa.org/schema/xfa-data/1.0/">
<p>Select to render each day before the next, otherwise the calendar will be laid out and rendered when finished, which is probably quicker but will appear like nothing is happening for sometime.</p>
</body>;
item = xfa.form.createNode("exData", "helpText");
this.desc.nodes.append(item);
item.value = helpText.toXMLString();


The position of the tooltip subform will default to a generally acceptable position but can be adjusted with the following also in the initialise event;

var xOffset = xfa.form.createNode("integer", "xOffset");
this.desc.nodes.append(xOffset);
xOffset.value = 48;

The effect you end up with looks like this;


These tooltips can also be used to display error messages as you can see for the start date field.

Incremental Rendering

This sample also shows several examples of updating the form contents as the form is being laided out.  Generally with a PDF form all the form objects are laided out and then rendered at the end.  This sample uses the layout:ready event to draw the next form object, which then triggers another layout:ready event to fire and the next form object to be drawn.  A form variable is used to keep track of what the next form object should be.

The first example is updating a 'console log' on the first page with calculation results, line at a time.  In this case the updating the form text field value does not cause the layout:ready event to fire so we have to manually trigger it with the xfa.layout.relayout() method ourselves. 

The second example places some instruction text overtop of the calendar but gradually fades out before the calendar is completed.

The third example is drawing the actuals cells of the calendar.  This particular example means that the total time taken to draw the calendar is longer but at least now we can see something happening.  It also mains the return button can be clicked while the form is still rendering.


Selecting Page Size

Another option in this sample is the ability to select the page size.  The easiest way to do this is to duplicate all the form objects for each page size.  But in this example all the form objects are defined under the (Reference Objects) node in the hierarchy view.  We then have a page for each page size in the form with an initial occurrence count of zero and the one that has been selected.  Looking in the XML view you can see that each page just has a reference to the calendar objects;

<subform w="197.3mm" h="284.3mm" name="A4Portrait">
  <breakBefore targetType="contentArea" target="A4Portrait.A4PortraitContentArea"/>  
  <bind match="none"/> 
  <event activity="ready" ref="$layout" name="event__layout_ready"> 
    <script contentType="application/x-javascript">
      Script.Body_readyLayout(this);
    </script>
  </event>
  <subform name="Calendar" use="#Calendar">
    <bind match="none" ref=""/>
    <keep intact="contentArea"/>
  </subform>
  <occur min="0" max= "-1"/>
</subform> 

Notice the use="#Calendar", this adds a reference to the calendar form objects.  You can move form objects to the (Reference Objects) node by dragging them from higher up in the hierarchy palette down.  Once there you then have to add an id attribute in the XML Source view, it is the value in the id attribute that you use in the use above (also added in the XML Source view).  Once the use attribute has been added all the form objects will appear in the hierarchy palette, but using them to select and edit properties can cause them to be bleed back into your form.  This can be useful at times when you need to override some properties but can easily cause some very strange behaviour.
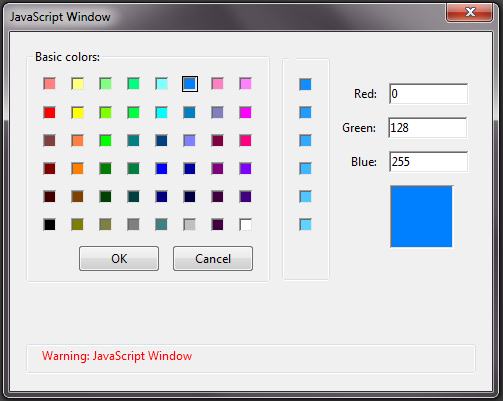
Color Picker

This sample also contains a color picker.  This has been implemented as a custom dialog using the app.execDialog() method.


This would look a lot better if I could reduce the amount of padding between the controls, but I haven't found a way of doing that.  It would also be a lot better if the images showed up in Acrobat / Reader version 11.0.7, in those version you will just have to enter the decimal values for red, green and blue.


Wednesday, 23 April 2014

Adobe LiveCycle Designer Tip #4 - Setting Breakpoints

Debugging a Designer form can be frustrating for people used to other environments.  With a Designer form you often have to add console.println(...) calls to your code so you can work out what is going on.  However, you can do most of the things you expect with a debugger, but there are a few tricks.

First you can only debug JavaScript, there is no support for debugging FormCalc scripts.  Second, you can only set breakpoints in event handlers, you can step into a script object but you can't set a breakpoint in one and the JavaScript debugger will not show you the code being debugged.  It will at least show you which line number you are on and the JavaScript debugger console will allow you to display the values of form object properties and variables.

To set a breakpoint you must open the form in Acrobat, the Preview PDF within Designer does not seem to support all the debugging functionality available.  The simplest way to do this is to perform a Preview PDF, Designer will generate a temporary file in your temp directory with a random name.  So in Adobe Acrobat you can go File ... Open ... then type "%temp%" (without the quotes) in the File name field click the open button and find the most recent PDF file with a randomly generated name something like "_165o26cev28fbb2ut.pdf".

Once open in Acrobat the JavaScript debugger will now display the Hierarchy of the form, you will be able the expand the XFA node and navigate to a piece of event code and set a breakpoint, like this one on line 2 of the validate event of TextField1, just click where the red dot is.


To see all the breakpoints you have set select BreakPoints in the Inspect: drop down (which will have defaulted to Local Variables), this will display all the current breakpoints, in this case we only have one so it looks like;


If you want to make the breakpoint conditional, select the breakpoint and click the edit button;


This will bring up a "change the breakpoint condition to:" dialog, like;


The default condition is true (so always breaks) but you can enter any JavaScript expression that resolves to true or false.  So in this example we could type this.rawValue.length == 3 and the breakpoint will only be hit when we validate the field and it has a three character long value.

You can also list all the breakpoints using the JavaScript console.  In the View drop down select console and type the following (to execute select the snippet and use the Ctrl-Enter on the numeric keypad);

for ( var i = 0; i < dbg.bps.length; i++ )
{
    console.println(dbg.bps[i].toSource());
}

This will display something like;

({fileName:"XFA:form1[0]:Page1[0]:Field[0]:TextField1[0]:validate", lineNum:2, condition:"this.rawValue.length == 3"})

Then you can use the following to clear the breakpoint

dbg.cb({fileName:"XFA:form1[0]:Page1[0]:Field[0]:TextField1[0]:validate", lineNum:2})

And to set the breakpoint again you can use;

dbg.sb({fileName:"XFA:form1[0]:Page1[0]:Field[0]:TextField1[0]:validate", lineNum:2, condition:"this.rawValue.length == 3"})

The dbg object also has methods for step into, step over, step out, etc but it is generally easier to use the toolbar of the JavaScript Debugger.

Watches

In the Inspect drop down there is also a Watches option this will allow you to enter any form object property or variable and watch the value change as you step thought your code.


Saturday, 12 April 2014

Programmatically updating Rich Text (or xHTML)

In a previous sample I gave an example of updating the rich text of a draw object using E4X.  In this sample I want to show an alternative using the Span objects from the Adobe Reader API. 

The Span object does not cater for all the attributes of rich text that are supported in an XFA form but sometimes can be easier than using E4X.

So an example, the rich text "Please click the red button" is generated by the xHTML;

<body xmlns="http://www.w3.org/1999/xhtml" xmlns:xfa="http://www.xfa.org/schema/xfa-data/1.0/">
    <p style="letter-spacing:0in">
        Please click the<span style="color:#ff0000">red</span>button
    </p>
</body>

As an array of Spans objects this is represented as

({text:"Please click the "})
({text:"red", textColor:["RGB", 1, 0, 0]})
({text:" button"})


Then the code to change all the red text to green would be;

var spans = util.xmlToSpans(Text1.value.exData["##xHTML"].saveXML());
for (var i = 0; i < spans.length; i++)
{

    if (spans[i].textColor && color.equal(spans[i].textColor, color.red))
    {

        spans[i].textColor = color.green;
        spans[i].text = "green";
    }
}

var xHTML = util.spansToXML(spans);
Text1.value.exData.loadXML(xHTML, falsetrue);

The color object used in this code is also from the Adobe Reader API, it defines some common colors  (that is black, white, dkGray, gray, ltGray, red, green, blue, cyan, magenta and yellow).  As well as the color.equal() method it also has a color.convert() method so to change all the colors to a gray scale we could;

var spans = util.xmlToSpans(Text1.value.exData["##xHTML"].saveXML());
for (var i = 0; i < spans.length; i++)
{

    if (spans[i].textColor)
    {
        spans[i].textColor = color.convert(spans[i].textColor, "G");
    }

}
var xHTML = util.spansToXML(spans);
Text1.value.exData.loadXML(xHTML, falsetrue);

If anyone still needs to have a color form for the screen and a black and white version for printing and uses rich text then this code could go in the prePrint event and then in the postPrint event you could revert to the original formatting with;

Text1.nodes.remove(Text1.value);
Removing the changes made in the Form DOM resets the properties to their initial values as defined in the Template DOM.

To build a rich text value from scratch we could;

var spans = [];

spans.push({text:"Hello "});

spans.push({text:NameField.rawValue, fontWeight:700, fontStyle:"italic"});
spans.push({text:", I hope you like this sample"});

var xHTML = util.spansToXML(spans);

Text1.value.exData.loadXML(xHTML, false, true);

If you need to change a plain-text Text field into a rich-text one then you can use the following code;

if (Text1.value.oneOfChild.className === "text")
{
    Text1.value.nodes.remove(Text1.value.text);
    var exDataNode = xfa.form.createNode("exData");
    Text1.value.nodes.append(exDataNode);
}

The sample SpanDemos.pdf includes a couple of other simple examples, as well as a more complicated example that will take the body element of the rich text then format and colorize it.  This sample also shows a workaround for the lack of support for the xfa-spacerun:yes style attribute in the Span objects.


background-color style attribute

This attribute is not mentioned in the XFA spec and there is no support for it with the Designer UI but Reader will render the background color, you just need to enter it in the XML Source view.  The trick with using background-color is that all elements following the one the style is applied to will inherit the color.  In an HTML page only the descendent elements would inherit the color.  This just means you need a second background-color style attribute to reset the color.  Designer doesn't play well with this attribute as every time you edit the text using the Design view you will have to add the second background-color style attribute back.

The color can be specified in hexadecimal or decimal;

background-color:#C4C4C4     or     background-color:rgb(196,196,196)

You can see an example of the background-color style attribute in this sample. 

I haven't gone though all the style attributes to see which ones are supported, but I did try adding a border and that didn't work for me.

Thursday, 27 March 2014

Using the util.print methods

Generally we can you display patterns to for formatting but there are times when we have to format values in code, and there are three handy methods in the Adobe Reader API;

util.printd() for dates
util.printf() for numbers
util.printx() for text

Here are some samples of using these methods;

Code Output Description
var v = util.printx(">?<*","ADOBE")
console.println(v)
Adobe This changes the first character (represented by the ?) to uppercase (represented by the >) and all trailing characters (represented by the *) to lowercase (represented by the <)
var v = util.printx("9999999999","My phone number is (02) 1111 2222")
console.println(v)
0211112222 Copies the first 10 digits, skipping any others characters
var v = util.printd("mmmm",new Date())console.println(v)

March Prints the current month in full.
var v = util.printd("dddd",new Date())console.println(v) Thursday Prints the current day of the week in full
var v = util.printd("date.short(){}",new Date(),true);
console.println(v)
27/03/14 Prints the date in the same format as the "datetime.short{}" display pattern.  The actual output will vary depending on the current locale.
var v = util.printd("date(fr){MMMM}",new Date(),true)console.println(v) mars Prints the current month in French
var v = util.printf("%,105d", 2)console.println(v) 00002 Prints the number 2 in a width of 5 characters with "0" characters padding


Friday, 28 February 2014

Updated: Drop-Down List Control with auto-complete (Searchable Drop-Down List)

I have made some changes to my "Drop-Down List Control with auto-complete" sample. 

To start I would like to explain the title of this sample, as it is really a textbox pretending to be the UI portion of the drop down list and a textbox pretending to be the list portion of drop down list.  I am not sure what I would have called the sample but "Drop-Down List Control with auto-complete" and "Searchable Drop-Down List" came from the title of the first two forum posts I tried to answer with this sample.  It seems we can't update the entries in a drop down list when the list is open, which is why I have tried to mimic the behaviour with these two controls.

The changes I have made are;
  • Display the list when the user enters the field, so the user knows this field is special
  • Show some "ghost text", giving instructions to the user
  • Sort the values in the list
  • Allow for strict scoping
  • Allow for keyboard users, previous the sample only worked with the mouse.

To use this in your own form

  • Copy the subform DropDownList to you own form
  • If you don't want the option to match first characters/match any characters the delete the RadioButtonList under the DropDownList subform.  You may need to update the code in the initialise event of DropDownList subform to set the default option, currently it defaults to match first characters.
  • Change the null display pattern in the Search textbox, to suit the items you are search over.  This is how the "ghost text" is implemented and currently says "'Search by country name".
  • Update the code in the change event of the Search textbox, this is where the matching is performed against the list of countries.  The format of the countries XML list is;
    • <Country>
            <Region>Oceania</Region>
            <Code>36</Code>
            <Name>Australia</Name>
        </Country>
    • So the binding expression for match first characters is;
      '$record.Country.[Lower(Left(Name,' + (xfa.event.newText.length) + ')) == "' + xfa.event.newText.toLowerCase() + '"]'
    • This matches the left characters of the Name element against the characters entered in the Search textbox, xfa.event.newText.  A case insensitive match is made by calling toLowerCase() on the xfa.event.newText and calling the FormCalc function Lower on the Name element.  I find the using FormCalc in binding expressions to be about four times faster.

The sample

For a PDF version of the sample with the countries data already imported download CountriesV2.pdf.  For the XDP template download CountriesV2.xdp and the preview data Countries.xml.