You can select a paper size, language, a start and end date and the colors and patterns for the borders, weekends, unused cells. Once the calendar has been generated you can then enter the details of the events in the calendar. Use ctrl-e to bring up the format text toolbar, you can also use ctrl-click to bring up a menu of color and fill pattern options.
The final PDF can then end up with something that looks like this;
On the screen, at normal magnification, the borders may appear to be overwritten but on paper the come out fine.
If you have stumbled across this page looking for something to generate a calendar then you can down load the SeasonCalendar.pdf, fill in the fields and away you go. If you are using Adobe Reader you may get a message saying "Cannot save file information", in which case you can try printing to a file or if all you are after is a paper copy then the standard printing options will still work.
This blog is about working with PDF Forms (or Adobe XML Forms ... XFA), so only continue reading if you want some ideas about writing your own forms.
Tool Tips
The tool tips in this form are generated by positioning a subform next to the relevant field instead of using the built in tooltips. This allows for rich text to be used and a more attractive looking tooltip. The fields can still be in a flowed container as long as the parent container is positioned and the tooltip subforms are in the same positioned container.This sample uses two subforms, one with a arrow pointing up to be positioned under a field and one with an arrow point left to be positioned to the right of a field.
Each field defines it's tooltip text in the initialise event;
var helpText = <body xmlns="http://www.w3.org/1999/xhtml" xmlns:xfa="http://www.xfa.org/schema/xfa-data/1.0/">
<p>Select to render each day before the next, otherwise the calendar will be laid out and rendered when finished, which is probably quicker but will appear like nothing is happening for sometime.</p>
</body>;
item = xfa.form.createNode("exData", "helpText");
this.desc.nodes.append(item);
item.value = helpText.toXMLString();
The position of the tooltip subform will default to a generally acceptable position but can be adjusted with the following also in the initialise event;
var xOffset = xfa.form.createNode("integer", "xOffset");
this.desc.nodes.append(xOffset);
xOffset.value = 48;
The effect you end up with looks like this;
These tooltips can also be used to display error messages as you can see for the start date field.
Incremental Rendering
This sample also shows several examples of updating the form contents as the form is being laided out. Generally with a PDF form all the form objects are laided out and then rendered at the end. This sample uses the layout:ready event to draw the next form object, which then triggers another layout:ready event to fire and the next form object to be drawn. A form variable is used to keep track of what the next form object should be.The first example is updating a 'console log' on the first page with calculation results, line at a time. In this case the updating the form text field value does not cause the layout:ready event to fire so we have to manually trigger it with the xfa.layout.relayout() method ourselves.
The second example places some instruction text overtop of the calendar but gradually fades out before the calendar is completed.
The third example is drawing the actuals cells of the calendar. This particular example means that the total time taken to draw the calendar is longer but at least now we can see something happening. It also mains the return button can be clicked while the form is still rendering.
Selecting Page Size
Another option in this sample is the ability to select the page size. The easiest way to do this is to duplicate all the form objects for each page size. But in this example all the form objects are defined under the (Reference Objects) node in the hierarchy view. We then have a page for each page size in the form with an initial occurrence count of zero and the one that has been selected. Looking in the XML view you can see that each page just has a reference to the calendar objects;<subform w="197.3mm" h="284.3mm" name="A4Portrait">
<breakBefore targetType="contentArea" target="A4Portrait.A4PortraitContentArea"/>
<bind match="none"/>
<event activity="ready" ref="$layout" name="event__layout_ready">
<script contentType="application/x-javascript">
Script.Body_readyLayout(this);
</script>
</event>
<subform name="Calendar" use="#Calendar">
<bind match="none" ref=""/>
<keep intact="contentArea"/>
</subform>
<occur min="0" max= "-1"/>
</subform>
Notice the use="#Calendar", this adds a reference to the calendar form objects. You can move form objects to the (Reference Objects) node by dragging them from higher up in the hierarchy palette down. Once there you then have to add an id attribute in the XML Source view, it is the value in the id attribute that you use in the use above (also added in the XML Source view). Once the use attribute has been added all the form objects will appear in the hierarchy palette, but using them to select and edit properties can cause them to be bleed back into your form. This can be useful at times when you need to override some properties but can easily cause some very strange behaviour.
Color Picker
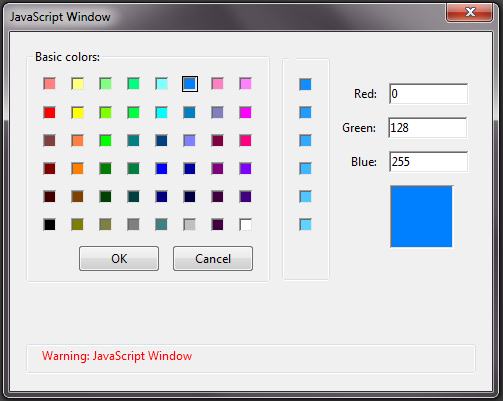
This sample also contains a color picker. This has been implemented as a custom dialog using the app.execDialog() method.This would look a lot better if I could reduce the amount of padding between the controls, but I haven't found a way of doing that. It would also be a lot better if the images showed up in Acrobat / Reader version 11.0.7, in those version you will just have to enter the decimal values for red, green and blue.


No comments:
Post a Comment